本文章已于 2021.9.24 更新,提供一个 JobSystem 加速示例。
本文章已于 2021.3.23 更新,将用到的 Shader 代码转为 HLSL 语言,支持 SRP Batcher(虽然在这里并没有什么卵用),优化模糊 Blit 次数。
前言
这阵子在研究战争迷雾相关的内容,在网上找了一些文章和开源库,主要有两种做法:
一是直接在场景上放一张大面片,用作迷雾,这种方式适用于相机角度不会发生改变的情况,否则会有穿帮的风险,但这种方案性能比较好。
二是基于屏幕空间对迷雾纹理进行采样,然后通过后处理的方式得到最终游戏画面,这种方案最为稳妥,但相应的性能会低一些。
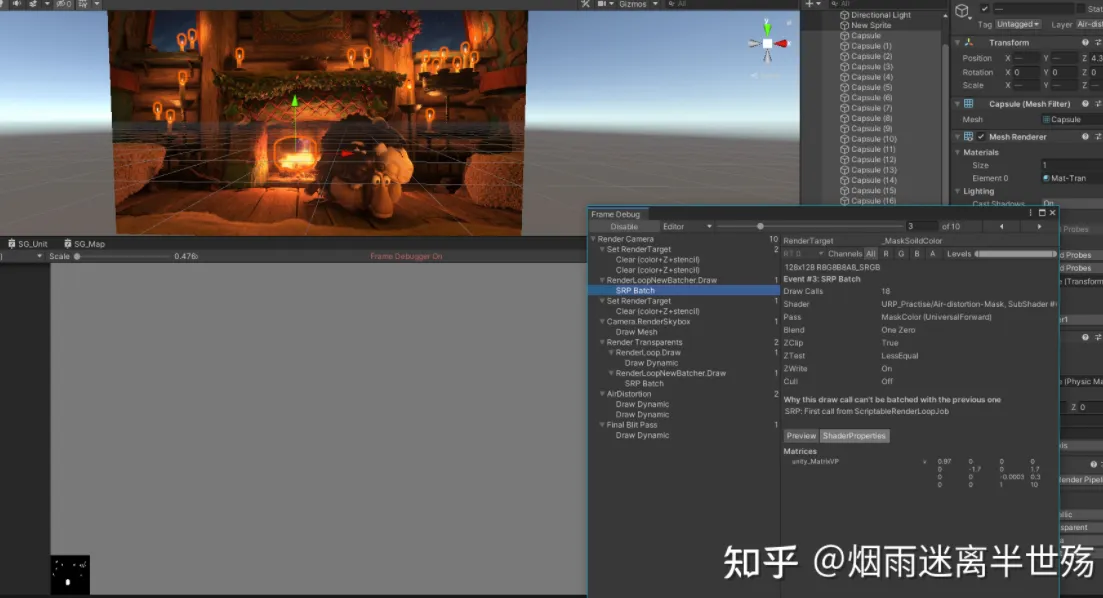
但是网上找得到的战争迷雾方案全都是 Built-In 管线下进行的,那么对于基于屏幕后处理的战争迷雾,就会不可避免的涉及到 OnRenderImage 和 Blit 操作,这些操作在默认不指定相机 RenderTexture 的情况下会涉及对 GPU 中的 FrameBuffer 进行拷贝 + 和 CPU 与 GPU 之间的数据传递,都是比较消耗性能的操作,需要尽量减少,单一个战争迷雾可能还好,后处理特效多起来后,对于移动平台来说,本就不富裕的带宽再次雪上加霜。
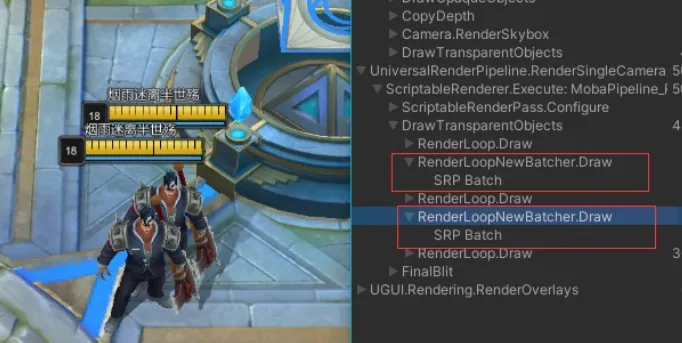
而 URP 管线下我们可以自定义 Pass 并自定义渲染顺序来减少 Blit 操作(这方面的成熟应用可以参照 ILRuntime 作者林若峰分享:次世代手游渲染怎么做 ),正好我也一直想实战一下 URP,所以准备研究下 URP 管线下的战争迷雾。
本文包括战争迷雾从 Built-In 到 URP 的管线切换和 JobSystem 加速优化以及开发过程中遇到的问题以及解决方案等内容。
由于本人第一次着手渲染效果方面的开发,可能有些地方考虑欠佳甚至是错误的,恳请各位大佬不吝赐教。
本文基于:FogOfWar 开源库
本文项目链接:接入 URP 管线的战争迷雾
正文
运行架构
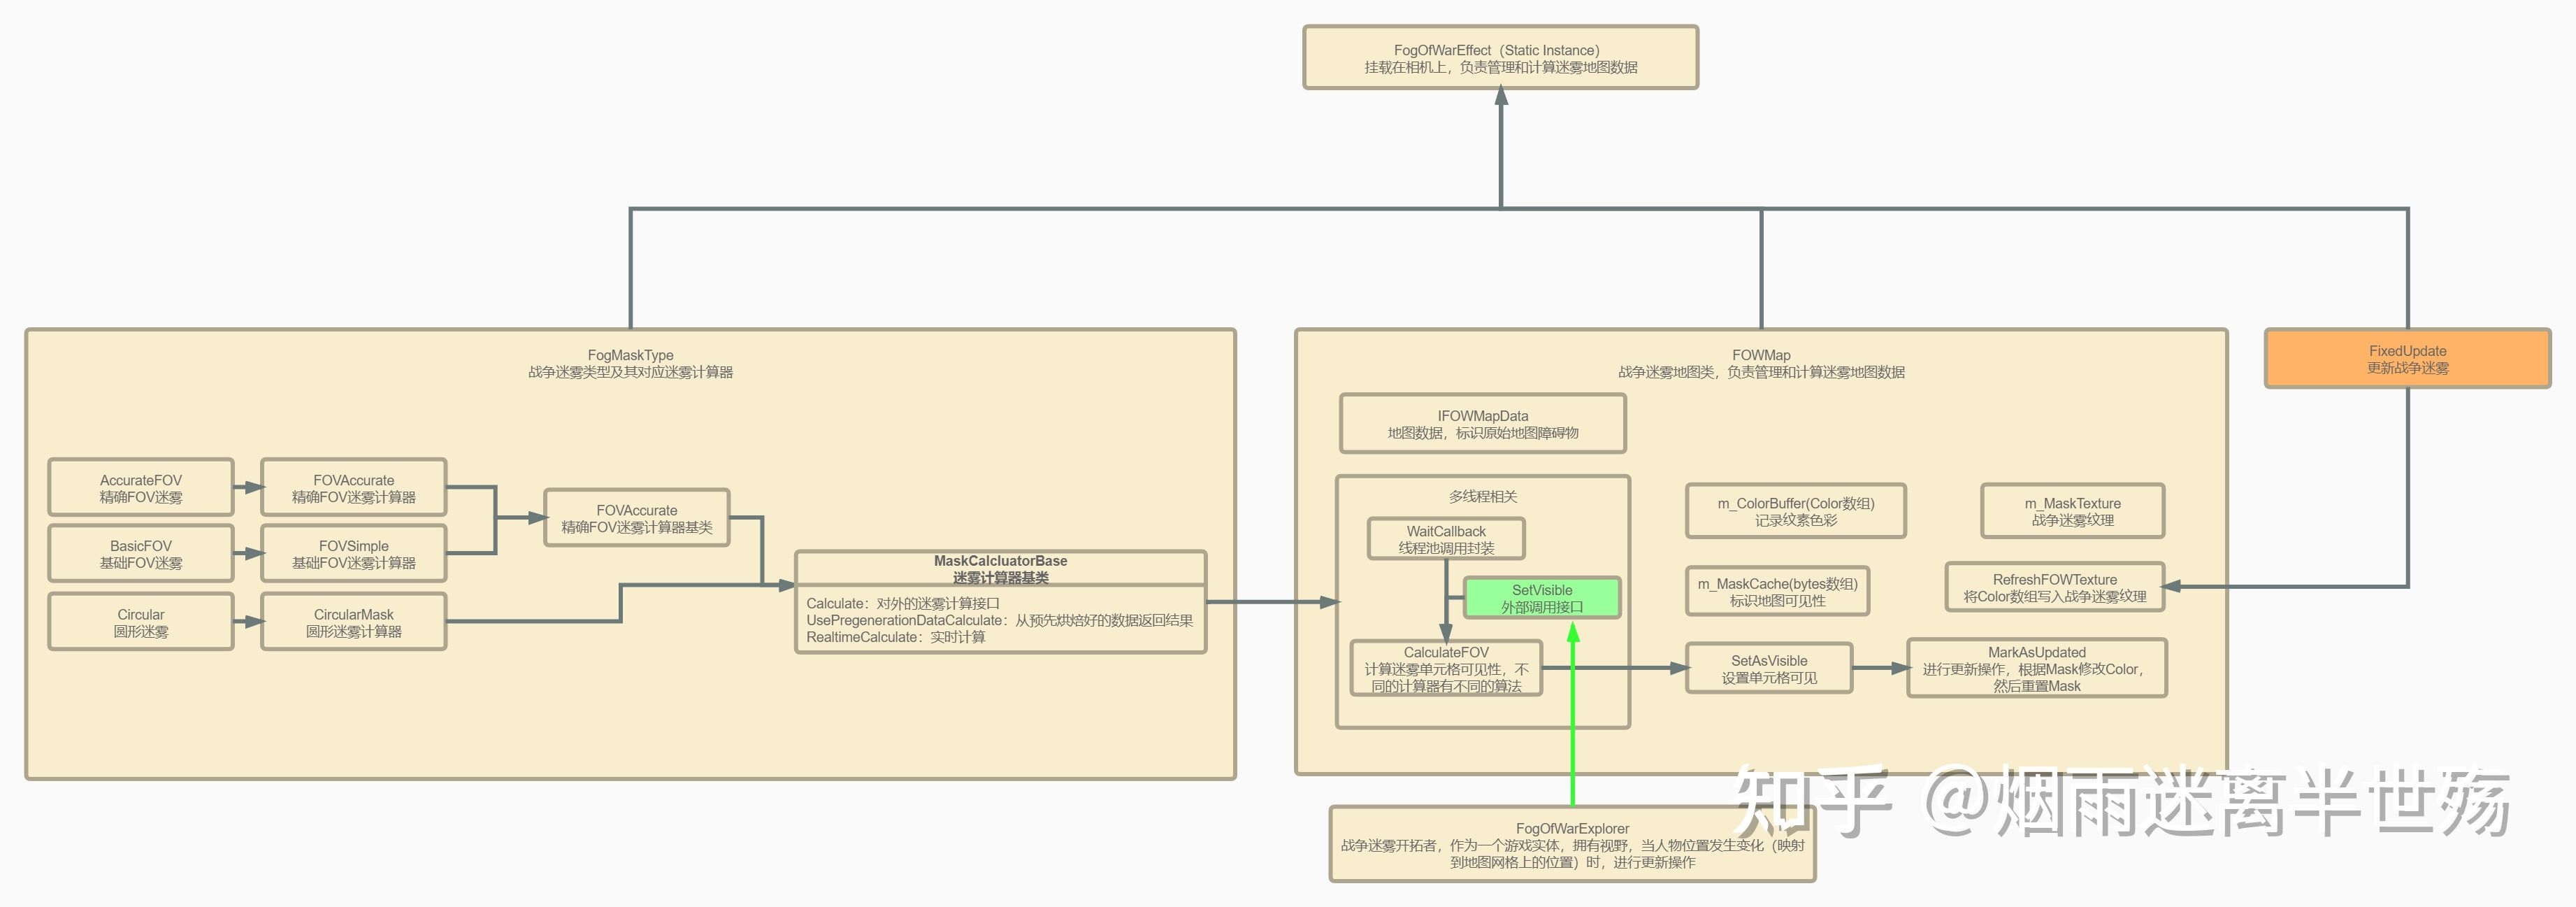
既然要进行大刀阔斧的管线切换,免不了先通读一下源码,了解一下它的运行流程。
运行流程就如上图所示,我们可以看到,对于战争迷雾的可见性计算是完全独立的模块,所以可以考虑进行 JobsSystem 加速。
渲染流程
这部分其实是有些波折的,使用的并非是开源库作者的最终做法,原因下文会给出。
战争迷雾的渲染流程是,先对 Mask Texture 进行模糊处理,然后使用 Shader 进行屏幕空间 uv 采样 Mask Texture 获取每个像素点对应纹素,最后与 RenderTexture 混合得到游戏画面。
作者首先定义了一个 WorldToProjector 矩阵,用于将世界坐标投影到迷雾 uv 空间,其中 centerPos 是战争迷雾中心位置的世界坐标
W o r l d T o P r o j e c t o r = [ 1 x s i z e 0 0 − 1 ∗ c e n t e r P o s . x x s i z e + 1 2 0 1 0 0 0 0 1 z s i z e − 1 ∗ c e n t e r P o s . z z s i z e + 1 2 0 0 0 1 ] WorldToProjector = \begin{bmatrix}
\frac{1}{xsize}& 0& 0&-\frac{1 * centerPos.x}{xsize} + \frac{1}{2} \\
0& 1&0 &0 \\
0& 0&\frac{1}{zsize} &-\frac{1 * centerPos.z}{zsize} + \frac{1}{2} \\
0& 0&0 &1
\end{bmatrix} W or l d T o P ro j ec t or = x s i ze 1 0 0 0 0 1 0 0 0 0 zs i ze 1 0 − x s i ze 1 ∗ ce n t er P os . x + 2 1 0 − zs i ze 1 ∗ ce n t er P os . z + 2 1 1
然后进入 Shader 部分,前半部分是我们老生常谈的从深度图重建世界坐标,internal_WorldToProjector 是我们上面提到的 WorldToProjector 矩阵
1
2
3
4
5
6
7
8
// 先对深度纹理进行采样,再得到视角空间下的线性深度值 float linearDepth = LinearEyeDepth(SAMPLE_DEPTH_TEXTURE(_CameraDepthTexture, i.uv_depth)); // 得到世界空间下的位置 float3 worldPos = _WorldSpaceCameraPos + linearDepth * i.interpolatedRay.xyz; // 通过internal_CameraToProjector矩阵最终得到战争迷雾uv空间坐标 worldPos = mul(internal_WorldToProjector, worldPos); // 使用战争迷雾uv空间坐标对迷雾纹理进行采样 fixed3 tex = tex2D(_FogTex, worldPos.xz).rgb;
大体流程就是这样,还有一个主要的问题是,屏幕空间的操作在 Bulit-In 管线下依赖于 OnRenderImage,这个 API 在 URP 管线已经无法使用了,所以需要将其 Blit 部分移动至一个 URP 下的 Render Feature。
URP 接入
首先介绍一下 URP 里的几个概念,更多内容可参见 官方 URP 手册
RenderFeature:继承自 ScriptableRendererFeature,可以使用 RenderFeature 来插入一个 Pass 到指定渲染阶段
RenderPass:继承自 ScriptableRenderPass,被 RenderFeature 引用,是将要插入到渲染管线的一个 Pass,具体渲染逻辑可以使用 Command Buffer 进行高度定制
RenderObjects:URP 自带的一个 RenderFeature,并已经实现好了 RenderPass,作用是指定渲染阶段对指定 Layer 的游戏物体统一执行一次渲染
CommandBufferPool:URP 提供的一个实用函数集,用于快速,高效获取,释放 CommandBuffer
RenderTextureDescriptor:一个 RenderTexture 的描述符结构体,其中包含创建一个 RenderTexture 所需要的所有信息
RenderTargetHandle:是一个作用类似 Id 的东西,使用 CommandBuffer 进行 Blit 操作的时候需要用到这个 Id,内部提供了几个 RenderTarget 方面的字段
RenderTargetIdentifier:和 RenderTargetHandle 配合使用,定义具体的 RenderTexture 引用
为了接管 Bulit-In 管线中的后处理模块,我们需要新建一个 RenderFeature 和 RenderPass(全部代码可以去文章开头的链接查看),下面给出 RenderPass 的核心代码(注意点和坑都在注释里了)
1
2
3
4
5
6
7
8
9
10
11
12
13
14
15
16
17
18
19
20
21
22
23
24
25
26
27
28
29
30
31
32
33
34
35
36
37
public override void Execute (ScriptableRenderContext context, ref RenderingData renderingData ){ if (FogOfWarEffect.Instance == null || FogOfWarEffect.Instance.m_Map == null ) return ; Texture2D fowTexture2D = FogOfWarEffect.Instance.m_Map.GetFOWTexture(); if (fowTexture2D == null ) return ; CommandBuffer cmd = CommandBufferPool.Get(m_ProfilerTag); CaculateRay(renderingData.cameraData.camera, cmd); cmd.SetGlobalMatrix(Internal_WorldToProjector, FogOfWarEffect.Instance.m_Renderer.m_WorldToProjector); cmd.GetTemporaryRT(m_FowTexture.id, fowTexture2D.width, fowTexture2D.height, 0 , m_FilterMode); cmd.Blit(fowTexture2D, m_FowTexture.id, m_BlurMaterial); cmd.GetTemporaryRT(m_TempColorTextureForBlurFOW.id, fowTexture2D.width / 2 , fowTexture2D.height / 2 , 0 , m_FilterMode); for (int i = 0 ; i < m_BlurInteration; i++) { Blit(cmd, m_FowTexture.id, m_TempColorTextureForBlurFOW.id, m_BlurMaterial); var tempColorTextureForExchangeBlurFOW = m_FowTexture; m_FowTexture = m_TempColorTextureForBlurFOW; m_TempColorTextureForBlurFOW = tempColorTextureForExchangeBlurFOW; } cmd.SetGlobalTexture(m_FowTexture.id, m_FowTexture.id); cmd.GetTemporaryRT(m_TempColorTextureForBlitCameraColor.id, renderingData.cameraData.camera.scaledPixelWidth, renderingData.cameraData.camera.scaledPixelHeight); Blit(cmd, this .source, this .m_TempColorTextureForBlitCameraColor.id, m_FogOfWarMaterial); Blit(cmd, this .m_TempColorTextureForBlitCameraColor.id, this .source); cmd.ReleaseTemporaryRT(m_TempColorTextureForBlitCameraColor.id); cmd.ReleaseTemporaryRT(m_TempColorTextureForBlurFOW.id); cmd.ReleaseTemporaryRT(m_FowTexture.id); context.ExecuteCommandBuffer(cmd); CommandBufferPool.Release(cmd); }
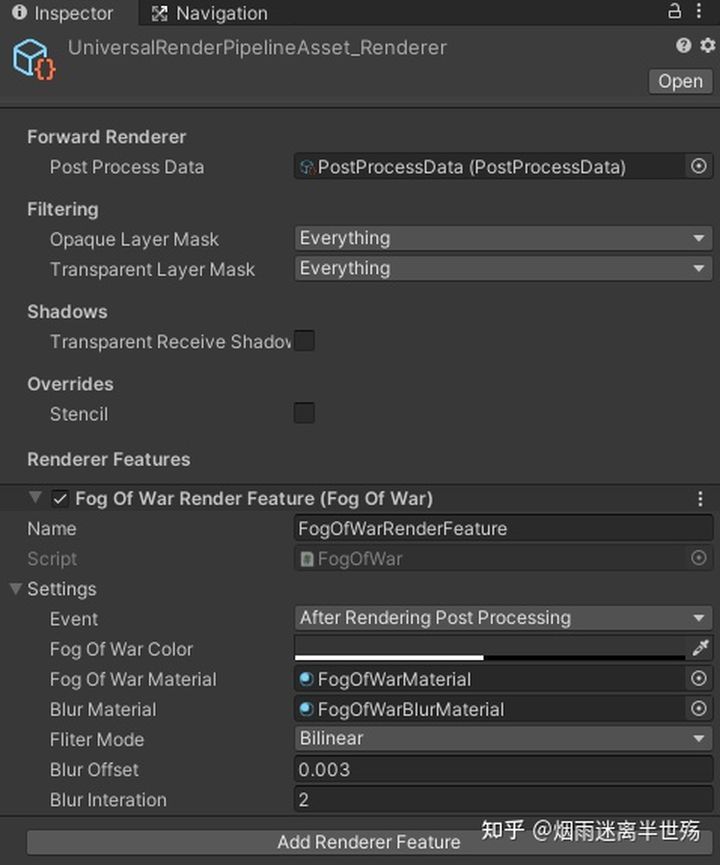
然后在我们创建的管线 Asset 里添加 RenderFeature 就好啦
最后说一下为什么没有使用迷雾开源库里原本的做法,因为它在最后渲染的时候,有这样一段代码
1
2
3
4
5
6
7
8
9
10
11
12
13
14
15
16
17
18
19
20
21
22
23
24
25
26
27
28
29
30
31
32
33
private static void CustomGraphicsBlit (RenderTexture source, RenderTexture dest, Material fxMaterial ){ RenderTexture.active = dest; fxMaterial.SetTexture("_MainTex" , source); GL.PushMatrix(); GL.LoadOrtho(); fxMaterial.SetPass(0 ); GL.Begin(GL.QUADS); GL.MultiTexCoord2(0 , 0.0f , 0.0f ); GL.Vertex3(0.0f , 0.0f , 3.0f ); GL.MultiTexCoord2(0 , 1.0f , 0.0f ); GL.Vertex3(1.0f , 0.0f , 2.0f ); GL.MultiTexCoord2(0 , 1.0f , 1.0f ); GL.Vertex3(1.0f , 1.0f , 1.0f ); GL.MultiTexCoord2(0 , 0.0f , 1.0f ); GL.Vertex3(0.0f , 1.0f , 0.0f ); GL.End(); GL.PopMatrix(); }
百度了一下大概也能知道是什么意思,就是直接 Draw 了一个面片到相机的近裁剪平面,然后使用相应的 shader 做处理,官方文档也有相应的解释
Note that if you want to use a depth or stencil buffer that is part of thesource(Render)texture, you have to manually write an equivalent of the Graphics.Blit function - i.e.Graphics.SetRenderTarget with destination color buffer and source depth buffer, setup orthographic projection (GL.LoadOrtho ), setup material pass (Material.SetPass ) and draw a quad (GL.Begin ).
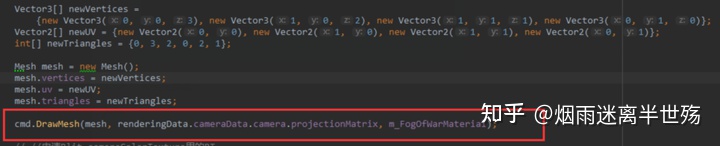
但是我在 URP 中尝试使用 CommandBuffer.DrawMesh 来替代的时候,却不行
所以只好舍弃掉这种计算方式,改为使用 CommandBuffer.Blit。
JobSystem 加速
JobSystem 介绍参见 官方文档链接
简单介绍一下 JobSystem 中两个主要接口
IJob:将一个操作放在一个线程执行
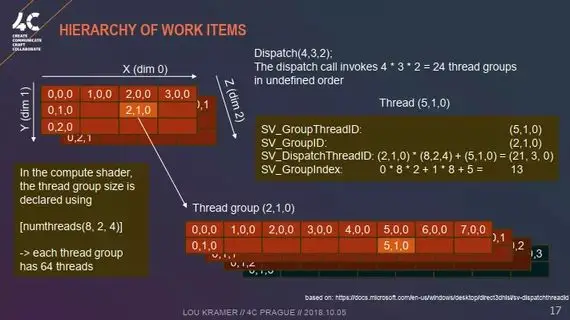
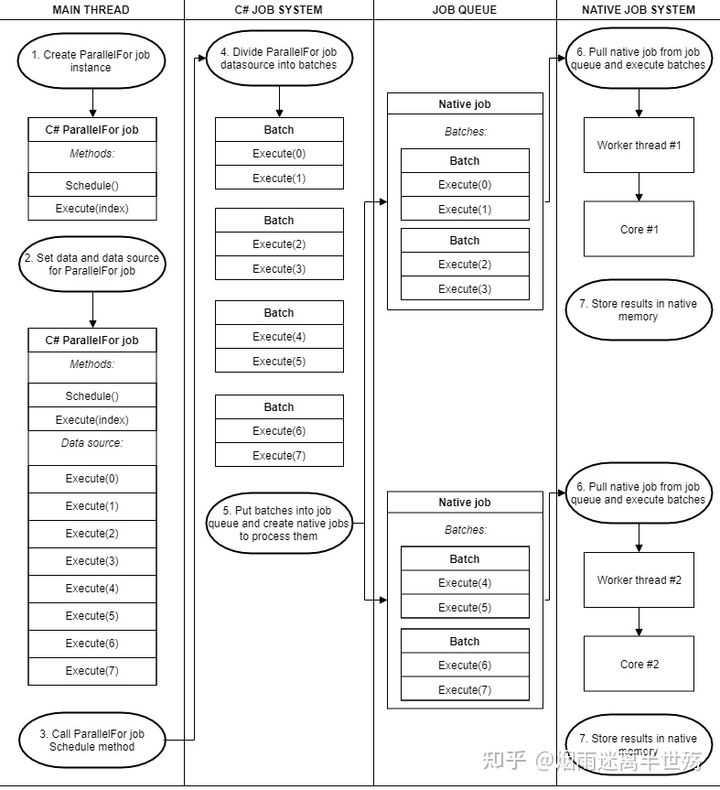
IJobParallelFor:可以将一个操作划分为多个块,然后放在多个线程执行,我们要使用的就是这个完全并行化的接口,具体流程参见下图
由刚开始的程序运行流程图我们可以知道,我们要使用 Job 加速的模块是计算地图 Mask 可见性区域,而每个可见性区域的计算都由一个 Unit 决定,所以我选择将每个 Unit 的视野数据作为一个 Job 单元数据,既然我们都选择了 Job 批量处理,就干脆每隔固定间隔统一更新一次所有 Unit 的数据
1 2 3 4 5 6 7 8 9 public void Update (){ if (Instance.m_FieldDatas.Count > 0 ) { Instance.m_Map.SetVisible(Instance.m_FieldDatas); Instance.m_IsFieldDatasUpdated = true ; } }
随后将算法替换为 Job 实现即可,需要注意数据的初始化和释放
1 2 3 4 5 6 7 8 9 10 11 12 13 14 15 16 17 18 19 20 21 22 23 24 25 26 27 28 29 30 31 32 33 34 35 36 37 38 39 40 41 42 43 44 45 46 47 48 49 50 51 52 53 54 private void CalculateFOV (object state{ if (state == null ) return ; var dt = (List<FOWFieldData>) state; ResetNativeArray(m_Calculater.ChangeVisiblePos, this .texHeight * this .texWidth); ResetNativeArray(m_Calculater.Arrives, this .texHeight * this .texWidth); m_Calculater.MapData.Clear(); m_Calculater.UnitRadiusSquare.Clear(); m_Calculater.UnitPos.Clear(); for (int i = 0 ; i < dt.Count; i++) { if (dt[i] == null ) continue ; m_Calculater.RealtimeCalculate(dt[i], this ); } if (m_Calculater.UnitPos.Length == 0 ) { return ; } for (int i = 0 ; i < this .texWidth; i++) { for (int j = 0 ; j < this .texHeight; j++) { m_Calculater.MapData[j * this .texWidth + i] = (this .mapData[i, j]); } } FOVCalculatorJob fovCalculatorJob = new FOVCalculatorJob(); fovCalculatorJob.MapDeltaX = this .m_DeltaX; fovCalculatorJob.MapDeltaZ = this .m_DeltaZ; fovCalculatorJob.MapDataHeight = this .texHeight; fovCalculatorJob.MapDataWidth = this .texWidth; fovCalculatorJob.UnitPos = m_Calculater.UnitPos; fovCalculatorJob.ChangeVisiblePos = m_Calculater.ChangeVisiblePos; fovCalculatorJob.Arrives = m_Calculater.Arrives; fovCalculatorJob.MapData = m_Calculater.MapData; fovCalculatorJob.UnitRadiusSquare = m_Calculater.UnitRadiusSquare; JobHandle handle = fovCalculatorJob.Schedule(dt.Count, 1 ); handle.Complete(); for (int i = 0 ; i < fovCalculatorJob.ChangeVisiblePos.Length; i++) { int iIndex = i % texWidth; int jIndex = i / texWidth; if (fovCalculatorJob.ChangeVisiblePos[i]) { this .m_Calculater.SetVisibleAtPosition(this , iIndex, jIndex); } } m_MaskTexture.MarkAsUpdated(); }
对于 FOVCalculatorJob 的详细内容,因为比较多,就不贴出来了,可以前往 FOVCalculatorJob.cs 查看
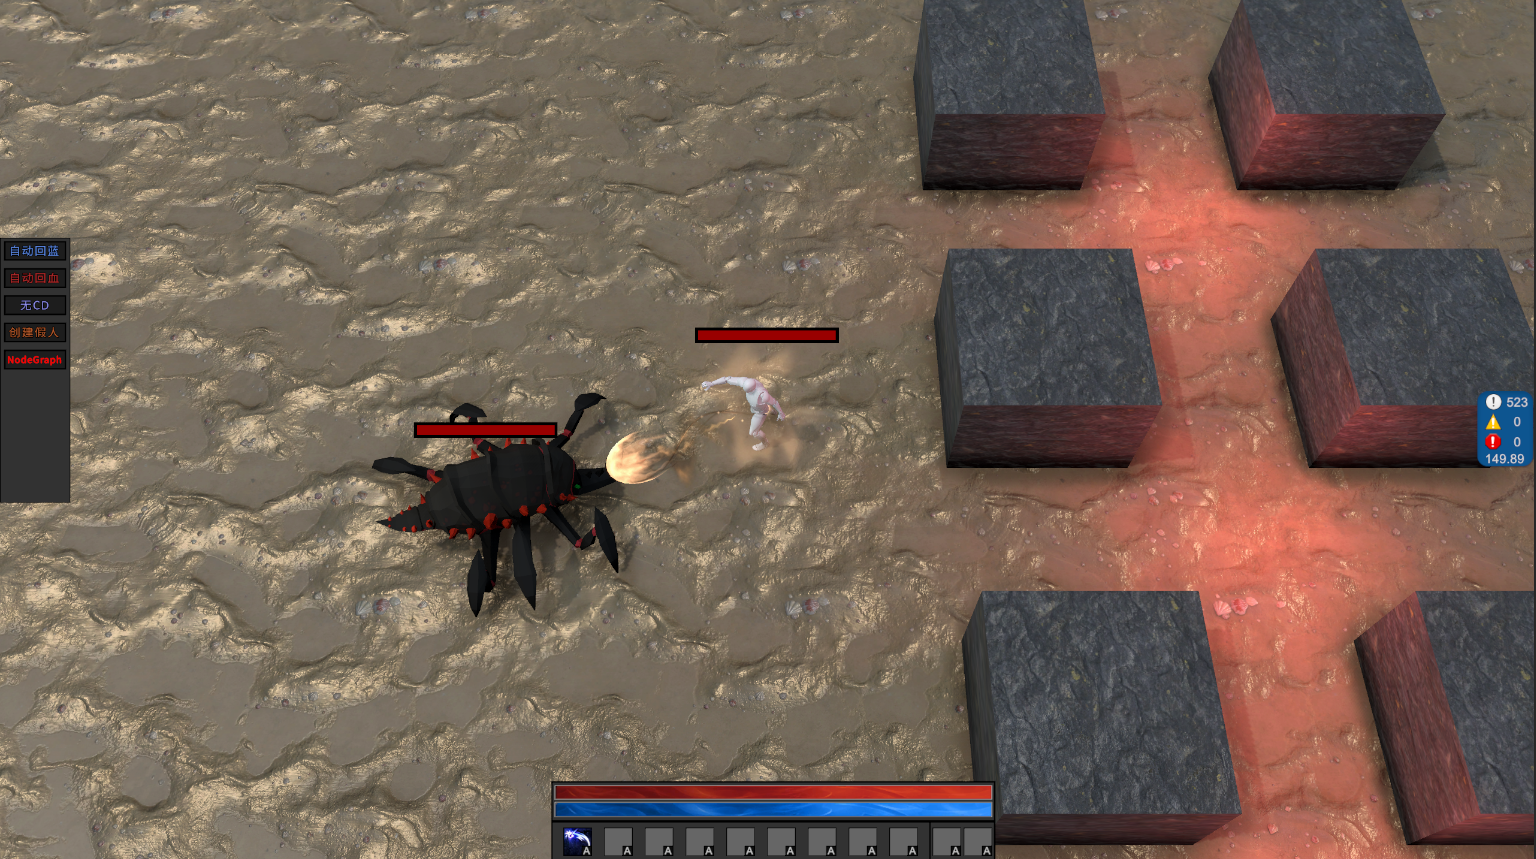
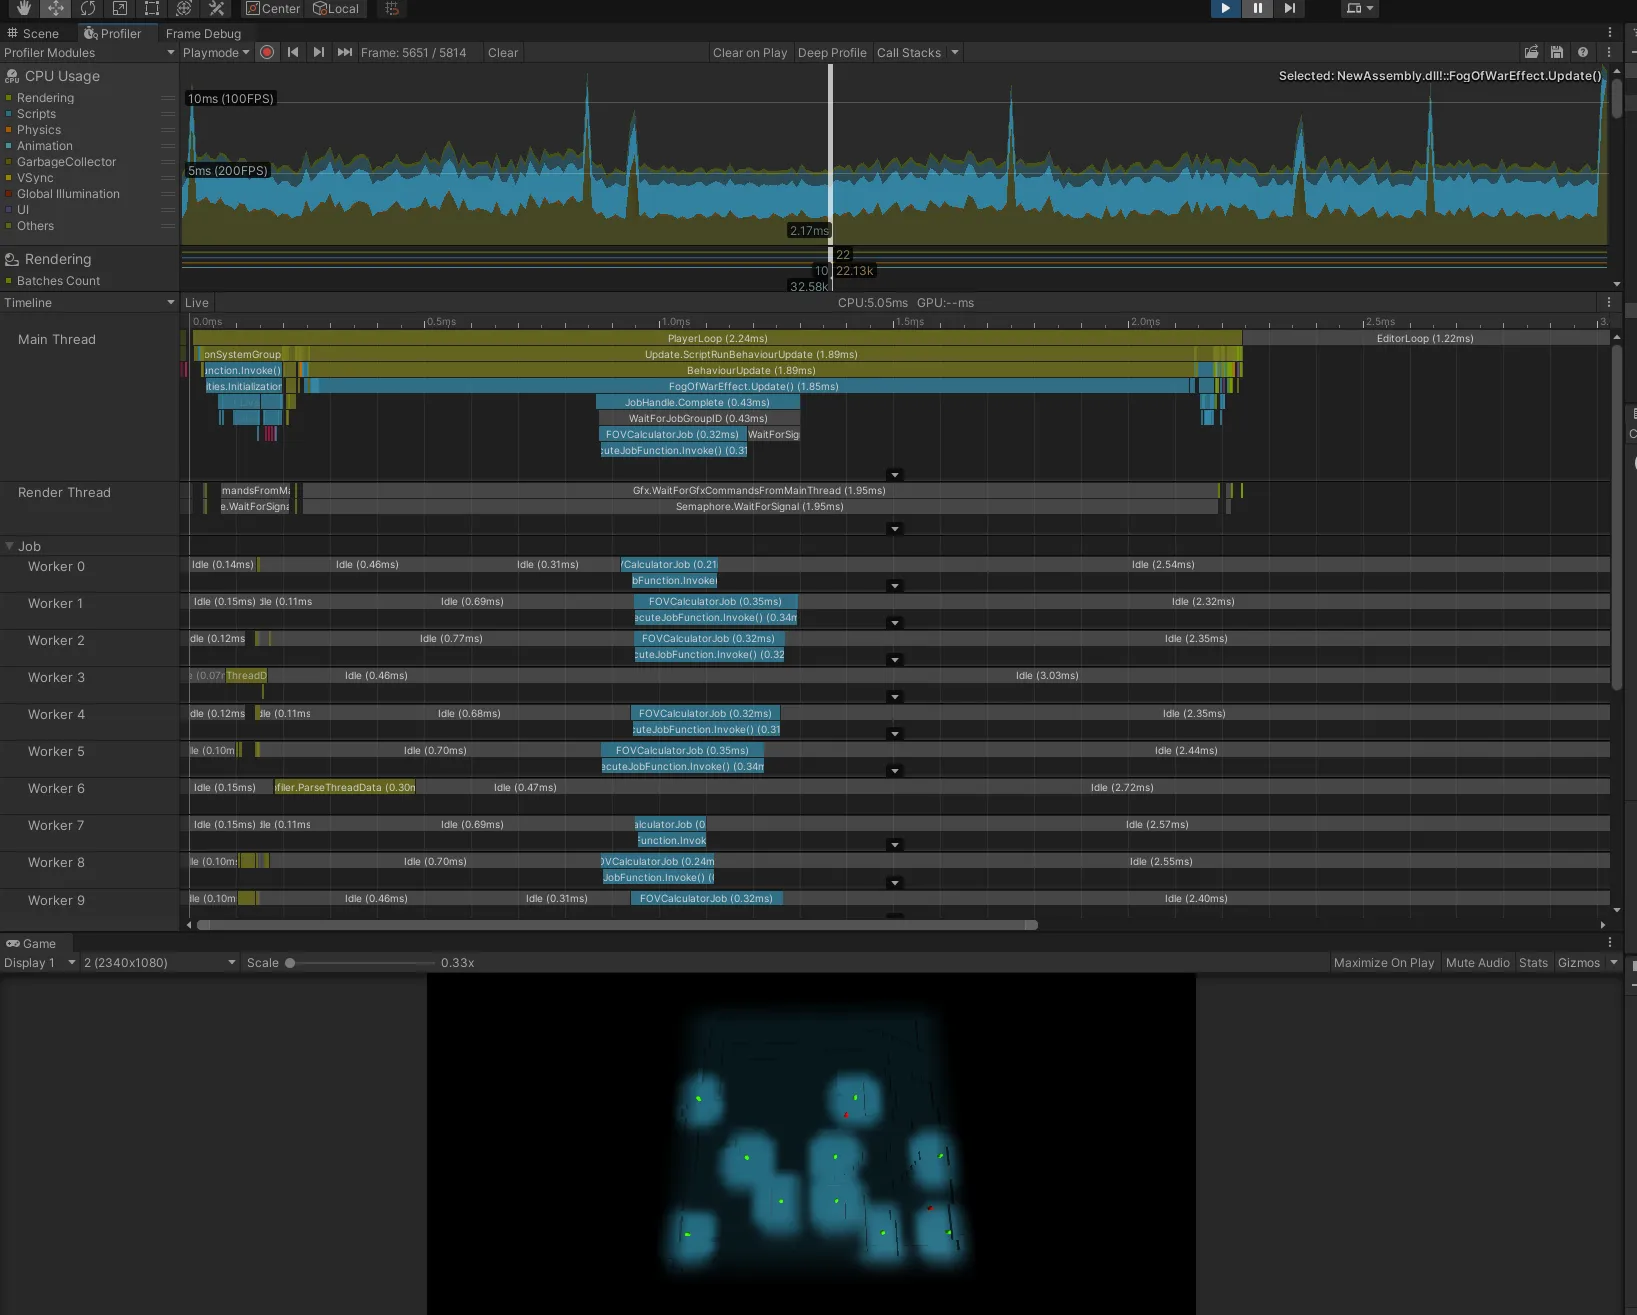
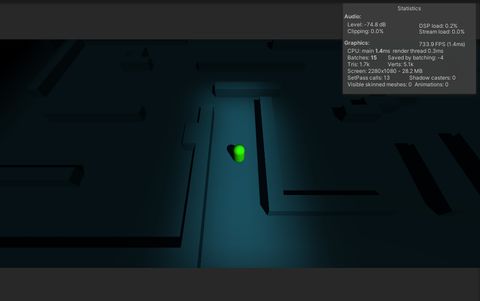
最后效果如下
在实践 JobSystem 期间遇到了一些问题
也总结了 JobSystem 的一些重要知识点
NativeArray 是唯一支持又读又写的,但是 限制为不能多个 JobBatch 写入同一个下标 ,否则会报错,如果实在要这样,可以尝试 NativeDisableParallelForRestriction 特性,这个战争迷雾的 Jobsystem 分支就有使用,但是需要注意的是不能有数组越界行为,否则 Unity 将有可能会崩溃
NativeXXX 系列容器实现包含了引用类型,所以不能有 struct 包 Native 容器的操作,会报错
网游中的战争迷雾
这方面其实比较好移植,我也推荐大家把战争迷雾的可见性计算放在服务器上(因为 LOL 就是这么做的,参见引用中的《LOL - 欢迎来到轮回绝境》),然后将结果下发到客户端
比较明显的问题有两个
服务器上的多线程计算,因为服务器没有 JobSystem 可用,所以需要我们自己去管理多线程,原作者的 Demo 自带了多线程,但是上了很多锁,并不优雅
数据传输,其实这一块是和战争迷雾分块优化相关联的,我们不应该每次都传输整个 BitMask 到客户端,这样 100*100 的地图就会有 1kb 左右的消耗,地图越大,消耗也是指数上升,具体方案可考虑四叉树分块
项目实装
参考
十:Unity 后处理性能优化
ILRuntime 作者林若峰分享:次世代手游渲染怎么做
Post Process Mobile Performance : Alternatives To Graphics.Blit , OnRenderImage ?
FogOfWar 开源库
LOL - 欢迎来到轮回绝境
LOL - 战争迷雾的故事
逍遥剑客 - 游戏中的战争迷雾
Ultimate Fog of War 插件
在 Unity 实现 RTS 游戏的战争迷雾
窝的舔 - 用于 2D 游戏光照的 ShadowMap 生成
在 Unity 中实现战争迷雾(屏幕空间采样过程)
流朔 -【Unity URP】以 Render Feature 实现卡通渲染中的刘海投影
[实战] Unity 基于 JobSystem 一步一步优化骨骼 DynamicBone 组件 (源码)
UnityShader——玩弄 GlobalFog
Fog Of War 原作者博客

 微信
微信 支付宝
支付宝